Before Your First Scan
Octane automatically scans your entire GitHub repo, analyzing each commit and running AI-powered vulnerability detection across all reachable smart contract code. The more predictable, complete, and organized your repo, the easier it is for Octane to trace call graphs and focus detectors on real attack surfaces.
A few preparatory steps will help you reduce noise and maximize coverage.
Version Control & Branch Designation
Octane will be installed on a specific branch (normally the main branch). Once installed, all pull requests into that branch will be scanned by our system. Subsequent commits on an open PR will be rescanned. Therefore, if you designate a main branch that is intended to contain production-ready code and a dev branch for iterative work, you can merge from dev to main and streamline your security review process.
While this is the optimal setup for most teams, sometimes teams prefer to just have a dev branch that is intended for both production and active development. You can install Octane on that branch and all PRs will be scanned.
Repo Layout for Accurate Analysis
A predictable and complete repo lets Octane resolve imports and trace calls end-to-end, so the analysis is more complete.
- Include maximum context. We recommend against splitting onchain code into multiple repos. Instead, try to merge these before your first scan. This will maximize the context for the model to search for bugs. This is also better for end-to-end, cross-contract testing. However, if you must split up code, please install the other repositories of onchain code as dependencies in the repo being used for analysis. Octane can explore dependencies and will be able to spot unique bugs this way.
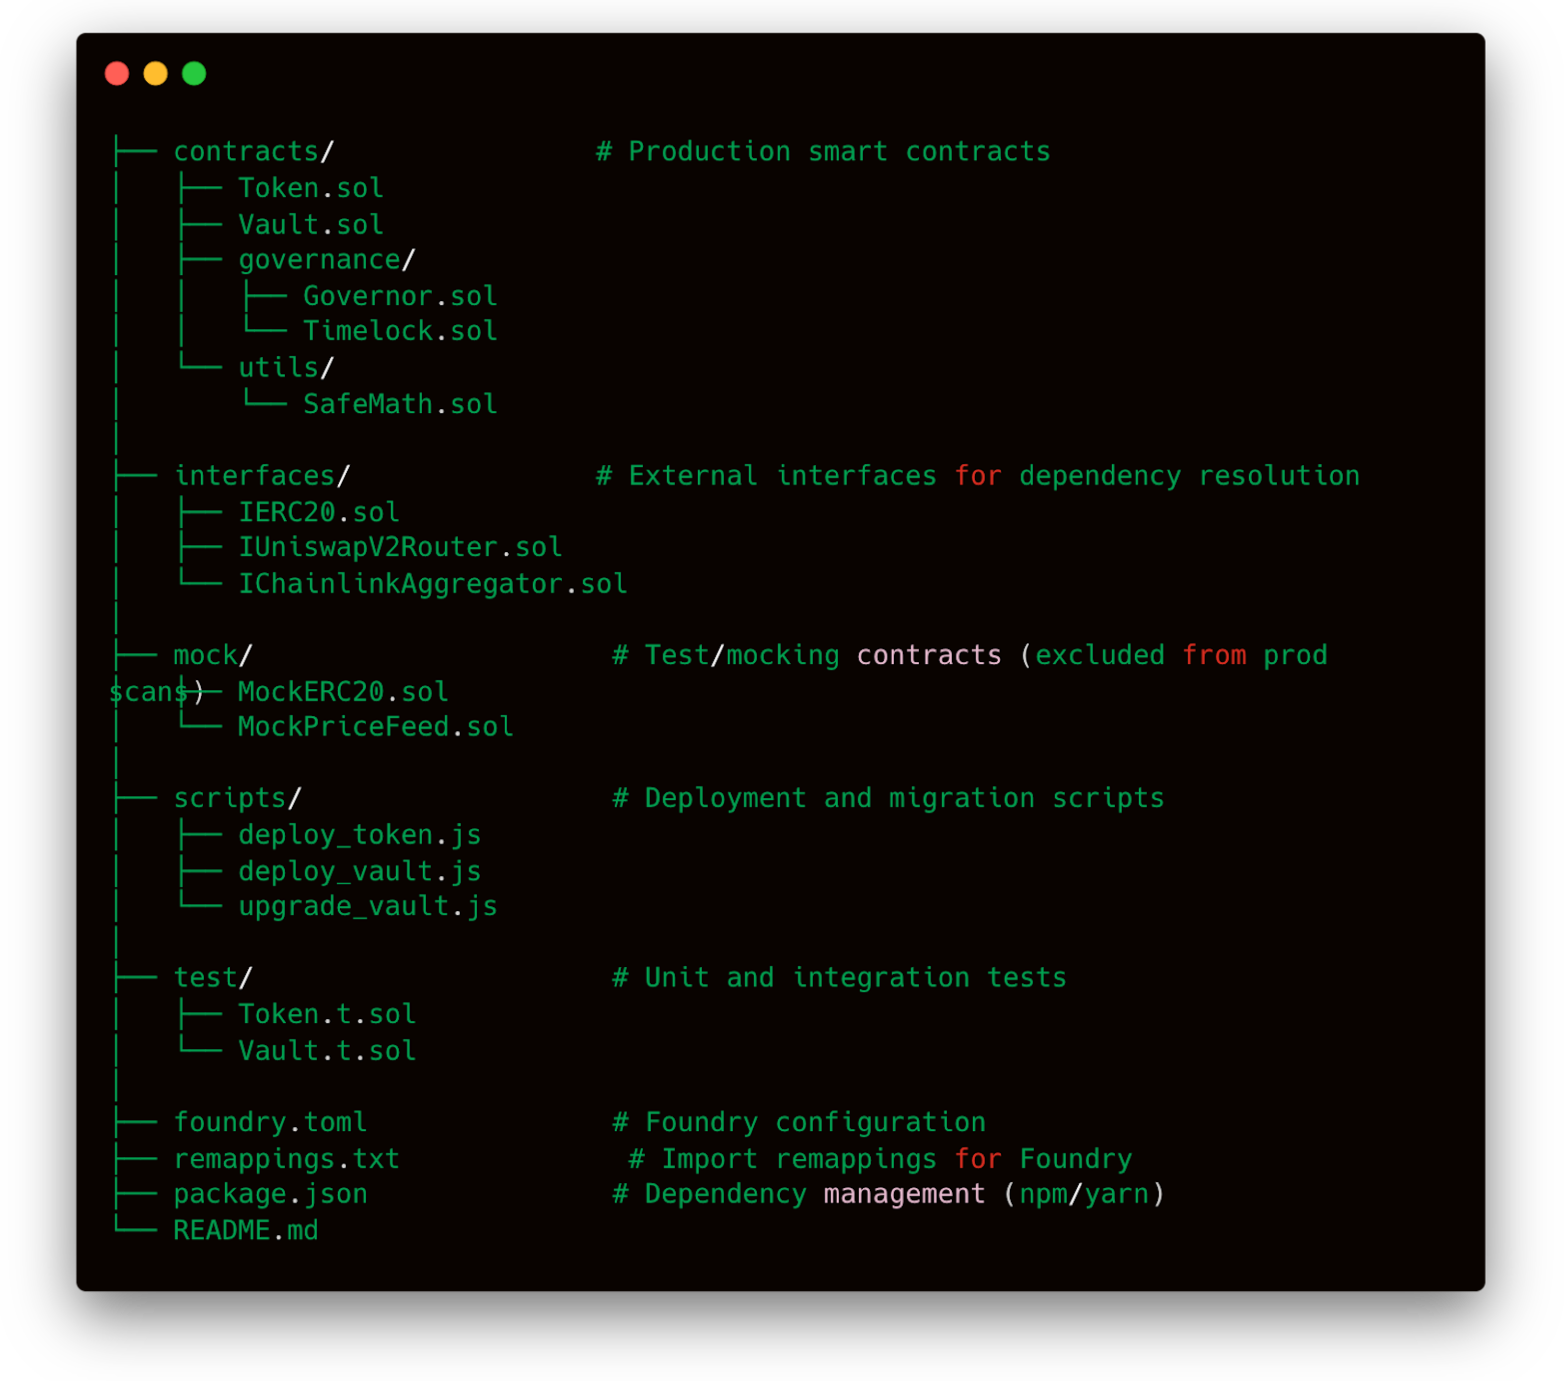
- Separate active vs deprecated. Archive or move unused contracts out of the scan path. This prevents stale vulnerabilities from showing up in PR checks. (Tip: use a /deprecated/ or /archive/ folder outside contracts/.)
- Include interfaces and dependencies in-repo. Store them locally so Octane can build complete inter-/intra-contract traces. Missing interfaces break context and reduce detector accuracy. Call graphs depend on accurate dependency management.
- Avoid mega-large contracts. Split large, multi-purpose contracts into smaller modules/files. This is not only useful for Octane because the platform uses file architecture analysis, but it's also a best practice to avoid excessively long Solidity files. We recommend keeping each Solidity file under 800 lines.
- Label folders using common nomenclatures. Use mock or mocks folders to track files used to mock functionality that are not meant to go to production. Use test or tests to contain test logic.
Practical Repo Tips
- Move tests/mock files into a /mock/ folder.
- Maintain a Foundry remappings.txt so Octane resolves imports correctly.
- If using npm/yarn, ensure package.json is usable so dependency parsing works.
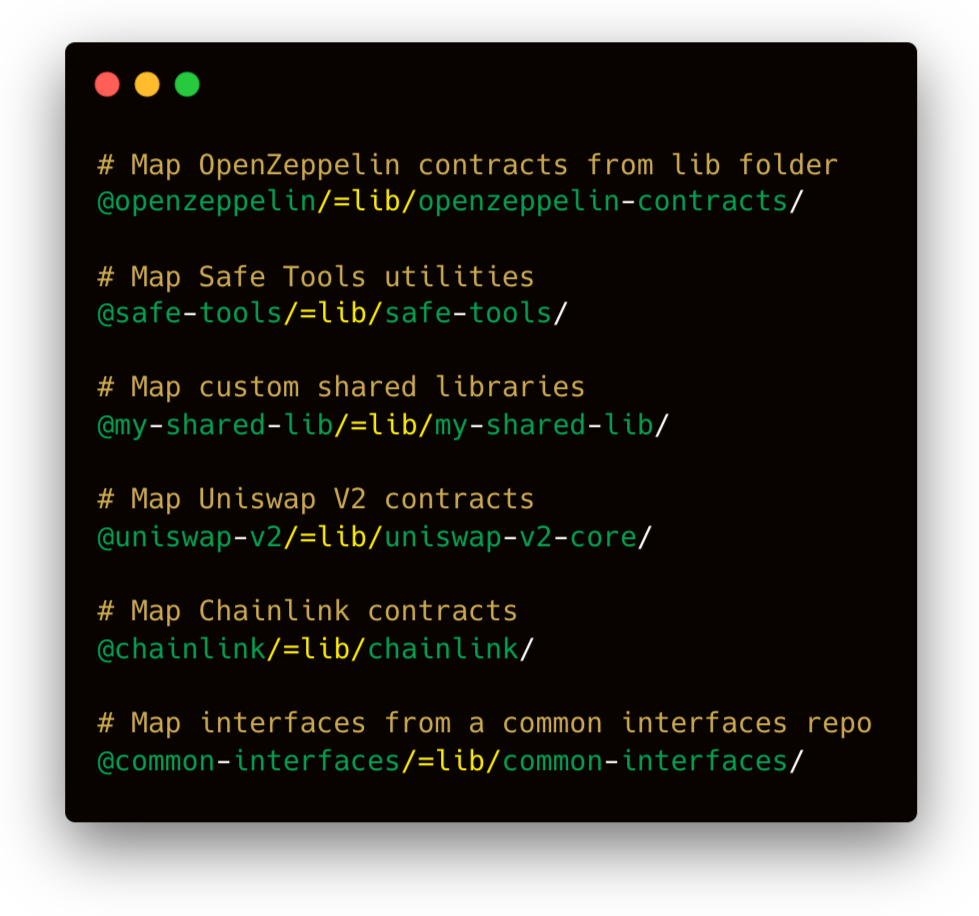
A clean layout lets Octane resolve imports and build complete call graphs. Better traces mean more relevant findings and faster fixes.
Performing Your First Scan
During your installation scan, you want to come prepared with several artifacts to streamline the process. In this section, we will go over these in depth.
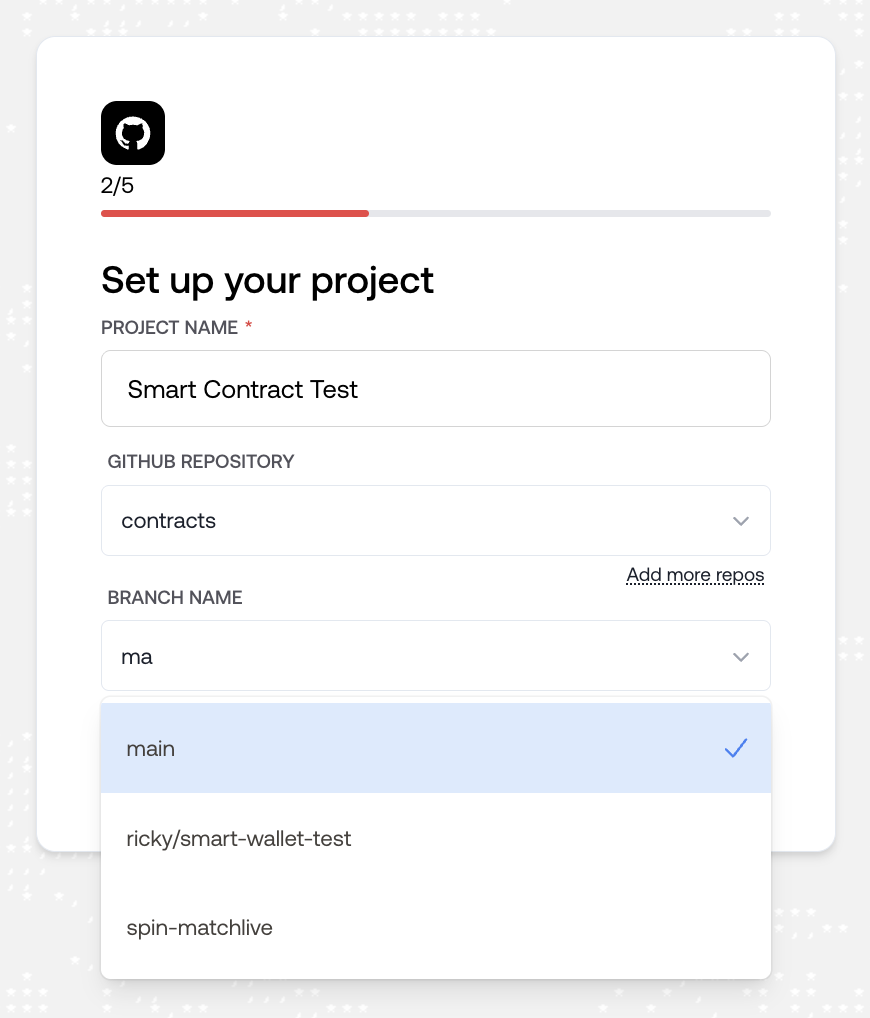
Branch Selection
Come prepared with the branch you’d like to specify for the installation and first analysis. Please refer to the above section on Version Control & Branch Designation.
Scope
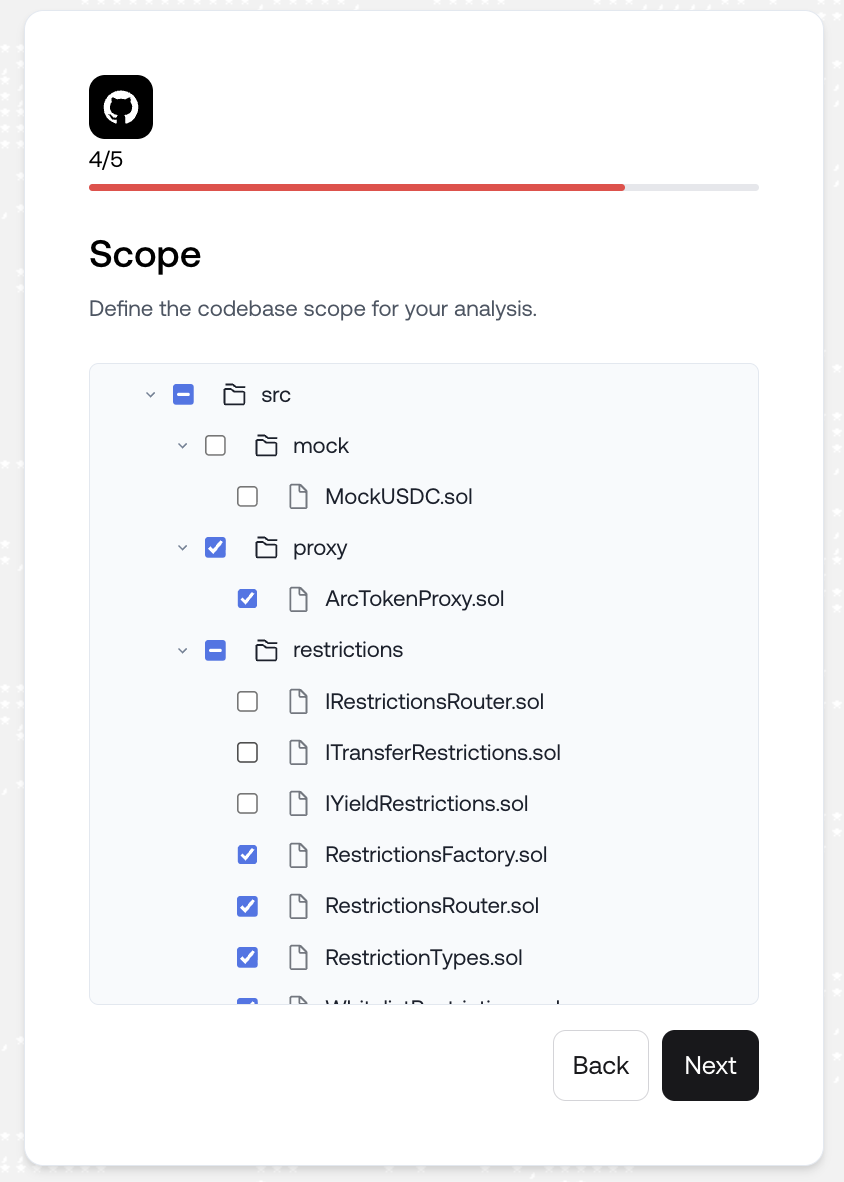
Octane allows you to configure the scope of your analysis across the repository. It is important to decide which files you’ll want to include in scope and out of scope. Octane will dynamically generate a predicted scope by filtering out tests, interfaces, mocks, etc, but it is up to you to decide the final scope. You will be able to select and deselect files according to your intended scope for deployment and analysis.
Interpreting Results
Severity
Octane’s severity scores are calculated as predicted impact × likelihood, with additional weighting for the importance of the affected function. This means a flaw in a governance contract controlling $500M in assets will rank far higher than the same flaw in an unused test helper.
The severity matrix below illustrates how different combinations of impact (what happens if exploited) and likelihood (how easy it is to exploit) map to the final severity rating.

Example: A high-likelihood reentrancy in a vault with extremely high impact scores as Critical.
When to Ask an Expert
Some findings are straightforward. Others leave room for interpretation or require deeper context before you can act on them confidently. Luckily, if you get stuck, you don’t need to burn hours on back-and-forths. You can just Ask an Expert.
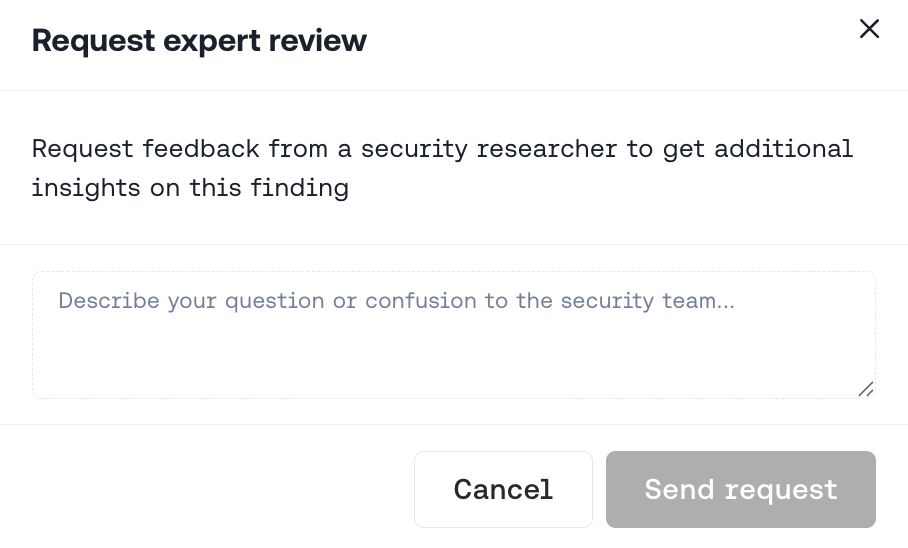
This feature connects your developers directly with Octane’s security researchers. When you encounter a confusing or borderline finding in the dashboard, simply flag it, and one of our experts will review the details and respond. This feedback matches exploit analysis with practical, implementation-ready guidance.
You can ask an expert to:
- Clarify edge-case findings so you know whether a result is a real risk or an acceptable condition.
- Get targeted remediation suggestions to resolve tricky vulnerabilities without guesswork.
- Understand the exploit logic behind a detector trigger, so you can prevent similar issues in future changes.
To get the most value, always include:
- Relevant code snippets or links to the finding in context.
- Any recent changes that may affect the result.
- Your specific question, whether it’s “What assumptions are being made here?” or “What’s the best way to fix this?”
Many teams incorporate Ask an Expert directly into their code review workflow. Doing so reduces wasted cycles chasing false positives and speeds up the resolution of legitimate issues.
Every expert interaction feeds back into Octane’s detection models, improving signal quality for everyone. Your question isn’t just helping you. It’s contributing to the security of the entire industry. So feel free to ask.
High-Octane Security
Quick Start Checklist
- Pick install targets: main/release (block High/Critical) and active dev branches (warn-only to start).
- Decide the scope of analysis with your team: what’s going to prod, what’s not.
- Tidy the repo: move mocks to /mock/, add remappings.txt, keep package.json accurate.
- Make sure your repo compiles and double-check dependency layout
Pilot Timeline (Typical)
- Day 0–1: Install Octane in GitHub; first scan + baseline.
- Day 2: Review findings on a call with a security researcher.
- Days 2–3: Remediate issues and acknowledge findings as valid, valid but won’t fix, invalid, or out of scope. Use Ask an Expert on edge cases.
- End of pilot: Recap all findings and confirm risks given acknowledged findings.
What You’ll Leave With
- A prioritized backlog of verified issues + proposed diffs.
- A set of important bugs that are remediated.
- A repeatable workflow your team can run on every PR.
Shift Left, Ship Safe
Ready to see Octane in your repo? Book your demo now.
Get Octane’s AI-powered offensive security in your CI/CD and see what it can do for your platform, your code, your security, and your peace of mind.


Subscribe to our newsletter